Preparing Your Home for Underfloor Heating Installation: The 2026 Homeowner’s Checklist
An estimated 60% of Victorian homes are currently under-insulated, meaning even the most advanced hydronic system will struggle to perform if the groundwork isn’t right. When you begin preparing your home for underfloor heating installation, it’s easy to get caught up in the technical specs of the pipes. However, the real secret to long-term comfort lies in your site readiness and thermal envelope. It’s common to feel a bit overwhelmed by the logistics of coordinating trades or worrying if your subfloor is actually suitable for a modern hydronic setup.
We agree that a premium heating system should be a source of relaxation, not a cause for construction delays. Our goal is to ensure your system delivers maximum efficiency and that “barefoot warmth” you’ve been dreaming of from the very first day. This article provides a clear, actionable checklist for your 2026 project, covering everything from insulation requirements to the specific timeline of the install. You’ll gain the confidence to manage the process like a pro, knowing exactly what needs to happen before our experts arrive on-site.
Key Takeaways
- Learn how to evaluate your subfloor’s suitability, whether you’re preparing for a new in-slab installation or a thin-profile screed renovation.
- Discover the critical technical requirements for preparing your home for underfloor heating installation, including electrical capacity checks for high-efficiency heat pumps.
- Understand the vital role of R-value insulation in creating a thermal barrier that prevents energy waste and keeps heat where it belongs.
- Master the logistics of site management by knowing how to coordinate floor coverings and trade schedules to avoid costly construction delays.
- Find out how localized expertise can help you design a silent, allergy-friendly system tailored specifically for Melbourne’s unique climate.
Structural Assessment: Is Your Subfloor Ready for Hydronic Pipes?
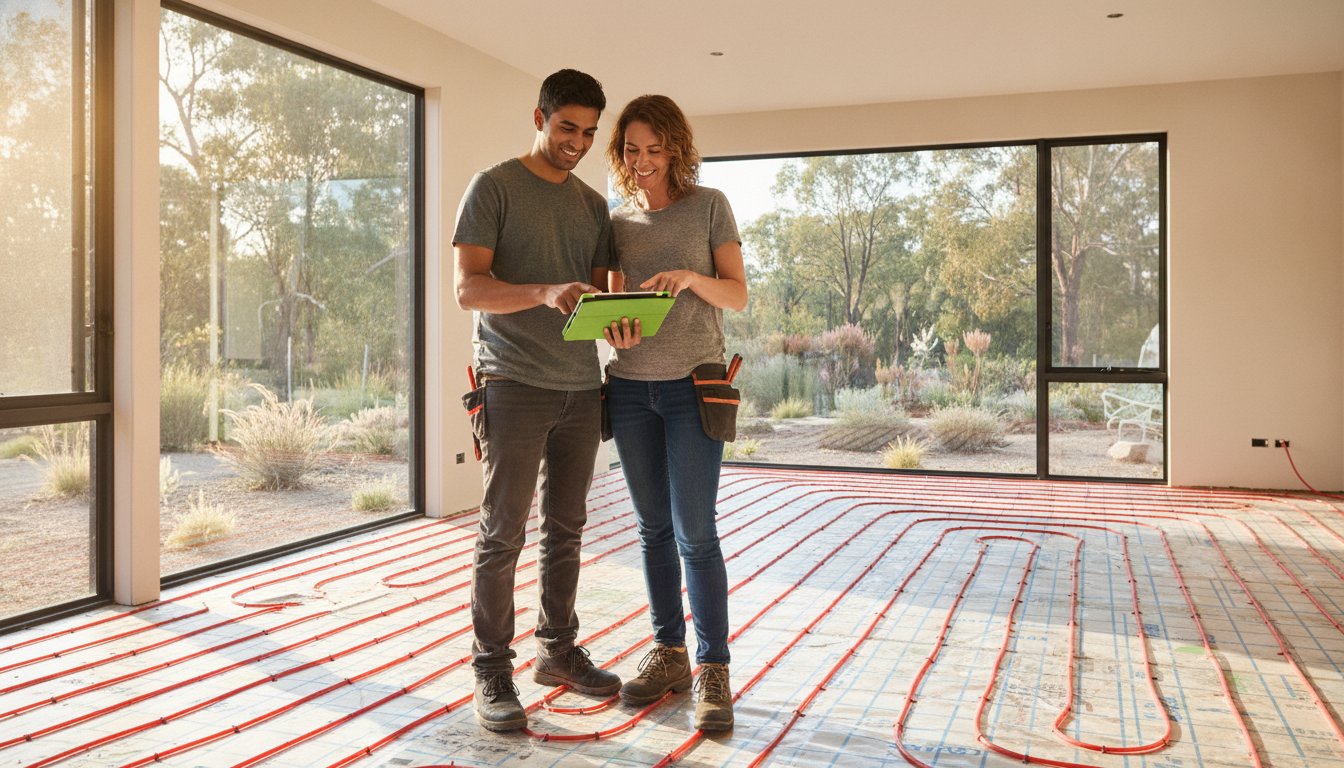
The foundation of any high-performance hydronic system is the surface beneath your feet. Before a single pipe is laid, we need to ensure the structural “canvas” is perfect. When you’re preparing your home for underfloor heating installation, the first task is determining which installation method fits your architecture. New builds typically utilize in-slab systems, where pipes are integrated into the concrete pour. Renovations often require thin-profile screed systems, which sit on top of the existing floor. Each path requires a different set of site conditions to ensure longevity and peak performance.
Precision is non-negotiable during this phase. We look for a subfloor levelness variance of no more than 5mm across the entire zone. Uneven surfaces can lead to air pockets or inconsistent screed thickness, which directly impacts how evenly the heat radiates through your home. You must also identify your “finished floor level” early. Deciding whether you’ll use tile, polished concrete, or engineered timber affects the total height of the floor. Failing to account for this can lead to frustrating issues with door clearances and skirting board heights once the project is finished.
If you have a suspended timber floor, structural integrity is the priority. Timber joists must be capable of supporting the weight of the system and any additional thermal mass. Underfloor heating systems have evolved significantly, allowing for lightweight plate systems in these scenarios, but the joists must be rigid to prevent floor bounce or pipe stress. We always recommend a quick inspection of the timber’s health before we proceed.
In-Slab vs. Over-Slab Hydronic Preparation
For new Victorian homes, coordination with your concretor is vital. The steel reinforcement mesh needs to be positioned so that our team can securely clip the PEX piping at the correct intervals. If you’re retrofitting, we need to verify that your existing slab can handle the weight of a 30-50mm screed layer. We also need to finalize the manifold location. This is the “brain” of your system, usually tucked away in a central laundry or utility cupboard. It requires clear access for the main pipe runs to branch out to each room without unnecessary bends.
Cleaning and Moisture Control
Site hygiene is a major factor in preparing your home for underfloor heating installation. The subfloor must be “broom clean,” meaning it’s free of dust, oil spills, or construction debris that could interfere with insulation bonding. In older Melbourne properties, we pay close attention to rising damp. Any moisture issues must be resolved before laying thermal barriers to prevent long-term structural damage. Finally, if a new slab has been poured, it must cure properly. A standard rule of thumb is 28 days for a concrete slab to reach full strength, ensuring it’s stable enough to house your new heating system.
Energy Source Readiness: Preparing for Heat Pumps or Boilers
After finalizing your structural plans, the next step in preparing your home for underfloor heating installation is ensuring your energy source is ready to perform. Whether you’re installing a new electric heat pump or upgrading an existing boiler, the “engine” of your system requires specific site conditions. For heat pumps, external space is the first priority. These units need adequate airflow to operate efficiently and must be positioned to meet local noise clearance regulations for neighboring properties.
If you’re sticking with gas for a renovation, your current boiler location must meet the latest Victorian safety and ventilation codes. Regardless of the heat source, you’ll need to plan the plumbing “spine”; the primary flow and return pipes that connect your heat source to the manifold. When designing Radiant floor heating, this “spine” should take the most direct path possible to minimize heat loss and installation complexity.
The 2026 Electrification Shift in Victoria
Melbourne is undergoing a significant transition. With the Victorian government mandating all-electric new builds starting January 1, 2027, homeowners in 2026 are increasingly choosing heat pumps to future-proof their investments. This shift requires early electrical assessment. You’ll need to verify if your switchboard can handle the dedicated circuit required by a high-efficiency unit. In many larger homes, 3-phase power is necessary to ensure the system runs smoothly during the coldest nights. It’s also wise to coordinate with solar installers. You can set your system to prioritize heating during peak generation hours, which maximizes your energy independence and helps you get the most out of your investment.
Manifold and Control Wiring
The manifold is the brain of your hydronic setup, and its location needs careful thought. It’s where the thermostat wiring will terminate, so you’ll need to identify these paths before the walls are closed. A standard 240V power point must be available at the manifold to power the pumps and zone actuators. You should also decide on your thermostat style early. While wireless thermostats offer convenience, hardwired versions are often preferred for their stability in complex residential layouts. If you’re ready to start your transition, exploring our guide to electric heat pumps is a great first step toward a carbon-neutral home.
Thermal Efficiency: Insulation and R-Ratings for Victoria
Underfloor insulation isn’t just an “extra” layer; it’s the thermal shield that makes your entire system viable. When preparing your home for underfloor heating installation, selecting the right R-value (Thermal Resistance) is the most critical decision for long-term efficiency. In Victoria’s climate, a high-density barrier is required to stop heat from escaping into the cold ground or the sub-structure of your home. You can find specific recommendations for our local conditions in our Underfloor Heating in Melbourne guide. To maintain this barrier, the vapor barrier must be meticulously taped and sealed. This prevents moisture from degrading the insulation’s performance over the decades.
By focusing on these thermal standards, you’re creating a high-performance environment that promotes family health and well-being. High-quality insulation ensures that your heat pump doesn’t have to work overtime to compensate for energy leaks. This results in energy efficient heating that remains silent and consistent. It’s the difference between a system that merely warms the floor and one that transforms the entire climate of your home.
Slab-Edge Insulation: The Most Overlooked Step
Many homeowners don’t realize that 80% of heat loss in a slab occurs at the edge, not through the bottom. Without perimeter foam, the heat travels horizontally through the concrete and dissipates into the external atmosphere. This process, known as thermal bridging, can significantly increase your running costs and reduce comfort near external walls. We install perimeter insulation carefully to ensure it sits flush, allowing your floor finishes to cover it seamlessly without aesthetic compromise. Edge insulation is mandatory for 7-star energy rated homes in 2026 to meet strict National Construction Code standards.
Choosing the Right Insulation Material
The choice between Expanded Polystyrene (EPS) and Extruded Polystyrene (XPS) depends on your specific project needs. XPS generally offers higher compressive strength, which is vital for ensuring the material won’t “settle” or compress under the immense weight of a concrete slab. For those preparing your home for underfloor heating installation in a suspended timber floor scenario, we often incorporate reflective foil layers. These layers are designed to bounce heat back upward through the floorboards. Always verify the compressive strength of your chosen material to ensure it can withstand the structural loads of your 2026 build or renovation.

Installation Logistics: Managing the Site and Timeline
Managing a construction site is like conducting an orchestra. Success depends on every trade knowing their cue. When preparing your home for underfloor heating installation, your role is to ensure the environment is controlled and the timeline is respected. This prevents the common anxiety of coordinating builders, plumbers, and electricians while the clock is ticking. A smooth installation isn’t just about the pipes; it’s about the sequence of events that happens before the first loop is ever laid.
Follow these five essential steps to keep your 2026 project on track:
- Step 1: Finalize floor coverings. Whether you choose tiles, polished concrete, or engineered timber, this choice dictates our pipe spacing and depth.
- Step 2: Clear the zone. Ensure all other trades are strictly off the floor 24-48 hours before the hydronic team arrives.
- Step 3: Secure storage. We’ll deliver high-value manifolds and pipes that require a dry, lockable area on-site.
- Step 4: Pressure testing. We must schedule a dedicated window to test the system’s integrity before the final floor or screed is poured.
- Step 5: Documentation. Take high-resolution photos of the pipe layout. It’s a lifesaver if you ever need to renovate or drill into the floor in the future.
If you’re ready to finalize your project timeline, contact our expert team to schedule your site assessment and ensure every detail is covered.
Coordinating with Other Trades
The “No-Go” zone is a concept we take seriously. Carpenters and electricians must stay off the floor during the pipe-laying process. A single stray screw or heavy tool drop can compromise the PEX piping. You should also brief your tiler or concretor on the specific requirements of a heated floor, ensuring they use flexible adhesives or screed additives designed for thermal expansion. Site hygiene matters; a clean floor is a safe floor for your new heating system.
Access and Site Safety
Providing a clear path for heavy equipment is essential, particularly if a modern heat pump needs to be craned into a tight backyard space. Ensure the site has temporary power and water available for the installation and testing phase. Safety is our priority, so please confirm that all pets and children are strictly excluded from the site during the chemical flush or pressure test. These steps ensure preparing your home for underfloor heating installation is a professional, stress-free experience for everyone involved.
The Melbourne Hydronic Advantage: Expert Installation
Choosing the right partner for your project is just as important as the quality of the pipes themselves. We bring over 30 years of experience to Melbourne and Geelong’s residential landscape, ensuring every system is tailored to the specific architectural needs of the region. When you’re preparing your home for underfloor heating installation, you aren’t just buying hardware; you’re investing in a legacy of technical precision. Our team prioritizes a full-service approach, managing the journey from the initial hydraulic design through to long-term system servicing and maintenance.
One of the most significant benefits of hydronic heating is its impact on your family’s well-being. Unlike traditional forced-air systems that circulate dust, pet dander, and allergens, underfloor systems provide radiant warmth without moving air. This makes them the gold standard for asthma-safety and hygiene. Because the system operates in total silence, it enhances the premium feel of your home, providing a level of comfort that you can feel but never hear. In 2026, meeting the rigorous 7-star NatHERS energy standards is a requirement for new Victorian builds, and our systems are engineered to help you exceed these benchmarks with ease.
Why Local Expertise Matters
Melbourne’s famous “four seasons in one day” creates a unique challenge for climate control. A system designed for a milder climate won’t have the responsiveness needed for a sudden Victorian cold snap. Our local knowledge allows us to program thermostats and zone controls that anticipate these shifts efficiently. We also understand the varied soil conditions across Geelong and the Mornington Peninsula. These factors influence how a slab-on-ground build should be prepared to ensure maximum thermal mass performance. Having a Victorian-based support team means you have direct access to local spare parts and experts who know your neighborhood’s specific challenges.
Next Steps: From Preparation to Performance
Once you’ve followed our checklist and finished preparing your home for underfloor heating installation, the next step is a professional site consultation. We’ll visit your property to verify the subfloor levelness, insulation integrity, and electrical readiness before our installers arrive. This final check ensures that the “first run” of your system is flawless. During the handover, we’ll walk you through your new control interface, showing you how to maximize efficiency during the winter months. Ready to start? Request a custom underfloor heating quote for your Melbourne home today and take the first step toward a lifetime of superior comfort.
Step Into a Warmer, Healthier Future
Transitioning to a high-efficiency hydronic system is one of the most rewarding investments you can make for your property. By focusing on subfloor levelness and high-performance insulation, you’ve already done the hard work to ensure your system runs at peak efficiency. Successfully preparing your home for underfloor heating installation eliminates the stress of construction delays and guarantees that your “barefoot warmth” is delivered without compromise. It’s about more than just pipes; it’s about creating a silent, comfortable environment for your family.
As a Victorian family-owned and operated business with over 30 years of local Melbourne experience, we’re here to guide you through every technical detail. We specialize in asthma-friendly heating solutions that prioritize your health and well-being. If you’re ready to move from the planning phase to performance, it’s time to verify your site readiness with a specialist. Book a Professional Site Assessment for Your Melbourne Underfloor Heating Project today. Your journey toward a more sustainable and comfortable lifestyle starts with a solid foundation. We look forward to helping you bring that vision to life.
Frequently Asked Questions
How long does it take to install hydronic underfloor heating?
A typical installation takes between two to five days for the pipework and manifold setup, depending on the floor area. For new builds, we usually split the process into two stages: laying the pipes before the concrete pour and installing the heat source later. Renovations using thin-profile screeds may require extra time for the material to cure before floor coverings can be applied.
Can I install underfloor heating under existing floorboards?
You can install hydronic systems under existing floorboards by using specialized heat transfer plates between the timber joists. This “dry” installation method allows you to enjoy radiant warmth without removing your original timber floors. We access the subfloor from below to secure the plates and PEX piping, ensuring the heat radiates efficiently through the wood without causing warping.
Do I need to upgrade my electrical switchboard for a heat pump?
Most Victorian homes require a switchboard assessment or upgrade when transitioning to an electric heat pump. These units are high-efficiency but require a dedicated circuit to handle the starting current and operational load. In larger Melbourne homes, we often recommend 3-phase power to ensure the system remains stable and efficient during peak winter demand without overloading your existing electrical infrastructure.
What is the best flooring to use with underfloor heating in Melbourne?
Polished concrete and ceramic tiles are the most effective choices for Melbourne homes because they have high thermal conductivity. These materials absorb and radiate heat quickly, maximizing the efficiency of your system. While engineered timber and certain carpets are compatible, they act as slight insulators, so we adjust pipe spacing during the phase of preparing your home for underfloor heating installation to compensate for these materials.
Will underfloor heating raise my floor height significantly?
In-slab systems don’t change your floor height at all because the pipes are buried within the structural concrete. For renovations, a thin-profile screed system typically adds between 15mm and 50mm to your floor level. It’s vital to account for this height early in the planning stage to ensure your doors, skirting boards, and kitchen cabinetry remain at the correct functional height.
How do I know if my concrete slab is suitable for heating?
A suitable slab must be structurally sound, level within a 5mm variance, and free from rising damp. When preparing your home for underfloor heating installation, we perform a site inspection to check for cracks or moisture issues that could affect the insulation layer. If your slab is older, we may recommend a liquid damp-proof membrane before laying the thermal barrier to protect the system’s long-term integrity.
Is underfloor heating better for people with allergies?
Hydronic underfloor heating is the best choice for families suffering from asthma or allergies. Traditional ducted systems blow dust, pollen, and pet dander around the home, but radiant heat is completely static. By warming the objects in the room rather than pushing air, the system maintains a much higher level of indoor air hygiene and prevents the circulation of airborne irritants.
What happens if a pipe leaks under the floor?
Modern PEX piping is incredibly durable and designed to last over 50 years without corroding or leaking. We perform rigorous pressure testing before the floor is covered to catch any installation errors immediately. If a leak were to occur due to accidental drilling, we use thermal imaging cameras to pinpoint the exact location, allowing for a localized repair without tearing up the entire floor.